 "Blue Condenser Mic", photo by Kelly Sikkema
Let’s talk about all the ways you can play and manage audio in your game. Audio makes an interesting topic; it’s relatively easy to get some audio playing in your game, but it’s often unclear how to move from the simplest use case to a slightly more complex one.
This is Unity for Software Engineers (now updated and available as a book), a series for those seeking an accelerated introduction to game development in Unity. More is coming over the next few weeks, so consider subscribing for updates.
AudioClip, AudioSource, and AudioListener
Let’s start with the three primary constructs involved with playing audio:
- An Audio Clip (in code
AudioClip) is an asset representing a sound file. - An Audio Source (in code
AudioSource) is a component on a GameObject. An Audio Source can play Audio Clips at the object’s location for any listeners to hear. - An Audio Listener (in code,
AudioListener) is a component on a GameObject representing the object receiving (i.e., listening to) audio.
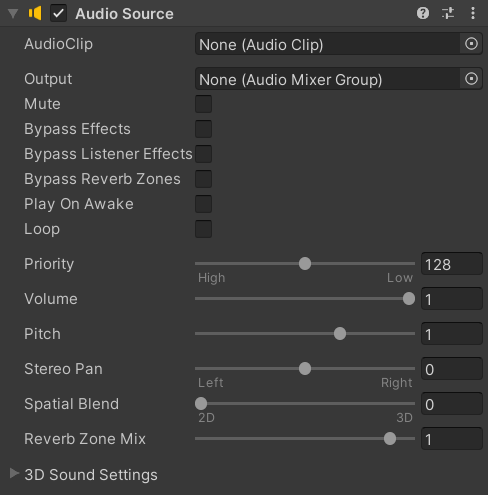
There should be one Audio Listener per scene. Typically, the Audio Listener component will be attached to the Main Camera object by default. You have full control over changing that, but putting your Audio Listener on your Main Camera ends up being a decent pattern to keep.
Each Audio Source has an Audio Clip as a property. An Audio Source can define at most Clip at a time, but you can change the clip on a particular source programmatically during gameplay. Two properties of an Audio Source of immediate interest are Play On Awake, which immediately plays the attached audio clip, and Loop, which loops a clip over and over.
While Audio Sources are associated with objects with locations, an audio source is “2D” (really, more non-dimensional than 2-dimensional) by default, which means the distance between the source and the listener has no impact. Changing the Spatial Blend property of an Audio Source to “3D” will cause its sound level to be affected by the distance between a source and listener.
Playing an Audio Source
On Awake vs. Programmatically
In most cases, you’ll find that you want to play sounds programmatically (since the trigger of when to play a sound will usually happen in response to something dynamic at runtime). But the simplest way to get started is by using Play On Awake.
Both options work with the “on loop” property. Playing a looped sound on awake means that the sound will be playing throughout an object’s lifetime since its creation or when the source is programmatically stopped. Playing a looped sound programmatically starts the loop at the moment triggered.
Play On Awake
By setting an Audio Clip on a source, and flipping on Play On Awake, the clip will immediately be played when the Awake message occurs.
I already wrote about when Awake and other messages take place on created objects. Unity’s Order of Execution documentation is also helpful here. The short answer is, for an object created in an active state with the component already enabled on creation, the Play On Awake effectively plays the second on object creation time.
Play On Awake helps with sound effects like explosions, where creating a visual
effect object (e.g., the explosion VFX or Particle object) corresponds to when a
sound should play. Note that while creating objects for effects is a common
pattern in tutorials, in reality1, this will cause excessive allocations, and
you’ll need to use
object pooling
to help. However, pooling your created objects means that the Start() and
Awake() functions are only ever called once, and you’ll instead need to play a
sound programmatically.
Playing Sound Programmatically
To play an Audio Source, use the
AudioSource.Play()
method within your code. You’ll need to make sure that a clip isn’t already set.
AudioSource exposes a AudioClip clip { get; set; } public property to help.
To call the Play() method programmatically, you will, of course, need a
reference to the AudioSource in question. You will typically do that in one of
two ways:
-
Within a component on the same Game Object, use
GetComponent<AudioSource>(). Use this in conjunction with the[RequireComponent(typeof(AudioSource))]attribute to force any Game Object containing your component to include an Audio Source.[RequireComponent(typeof(AudioSource))] public class Weapon : MonoBehaviour { private AudioSource audioSource; // Not serialized. private void Awake() { audioSource = GetComponent<AudioSource>(); } public void OnFire(InputAction.CallbackContext context) { if (!context.performed) return; audioSource.Play(); // Other actions related to firing a weapon. } }In reality, you’ll probably want a few layers of separation between an input controller, which triggers both game logic (“player should fire”), VFX (“smoke from gun”), and SFX (“play bullet noise”). We’ll cover various patterns to do this kind of separation in later installments.
Note that this will get repetitive quickly since you’re always playing the same clip every time the player fires. We’ll discuss below how you might spice this up.
-
By explicitly receiving its reference via the Editor. This is helpful if the component will be on a different Game Object than the Audio Source, or if the component is generic enough, it will sometimes be on a different object. This is also helpful if you want to be playing various audio sources, depending on the situation.
 public class Weapon : MonoBehaviour
 {
     public AudioSource audioSource;  // Serialized.
     // Alternatively:
     // [SerializeField] private AudioSource audioSource;

     private void Awake()
     {
         Debug.Assert(audioSource != null, this);
     }

     public void OnFire(InputAction.CallbackContext context)
     {
         if (!context.performed) return;

         audioSource.Play();

         // Other actions related to firing a weapon.
     }
 }
An AudioSource also includes PlayDelayed(float delay) to play the source
after delay seconds, and PlayOneShot(AudioClip clip) plays a specific clip
once without looping it. Multiple clips can be played simultaneously (and
overlap) on the same source using PlayOneShot. See the
method
and component
documentation for more details.
Playing an Audio Source On-Demand
To play an Audio Source on-demand, you will need to call the Play or
PlayOneShot methods programmatically. You can also call these methods via
UnityEvents from the
inspector, as discussed in the
Input System overview, which
extensively uses UnityEvent in the public API for the Player Input Controller.
Suppose an AudioSource only ever plays one sound, we can set the clip through
the inspector and treat it as a constant. If you are playing more than one sound
(e.g., randomizing a bullet sound or playing different sounds for different
situations). In that case, you’ll need to pass the AudioClips as serialized
fields to your components and either set these on the source or pass them to
PlayOneShot.
For example:
using UnityEngine;

[RequireComponent(typeof(AudioSource))]
public class RandomizedAudio : MonoBehaviour
{
    private AudioSource source;
    public AudioClip[] clips;

    private void Awake()
    {
        Debug.Assert(clips != null, this);
        Debug.Assert(clips.Length != 0, this);

        source = GetComponent<AudioSource>();
    }

    public void Play()
    {
        int clipToPlay = Random.Range(0, clips.Length);
        source.PlayOneShot(clips[clipToPlay]);
    }
}
This can be attached to an object with an AudioSource as such:
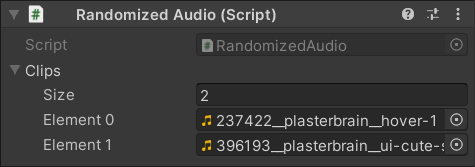
Screenshot of RandomizedAudio on a GameObject. Note that the GameObject must have an Audio Source (and the Editor will add one manually if none exists on the object).
In reality, your various sounds might have different inherent volumes, so you might decide to tweak this a little bit to set a different volume for each clip:
using UnityEngine;

[System.Serializable]
public struct TunedAudioClip
{
    public AudioClip clip;
    [Range(0, 1)] public float volume;
}

[RequireComponent(typeof(AudioSource))]
public class RandomizedAudio : MonoBehaviour
{
    private AudioSource source;
    public TunedAudioClip[] clips;

    private void Awake()
    {
        Debug.Assert(clips != null, this);
        Debug.Assert(clips.Length != 0, this);

        source = GetComponent<AudioSource>();
    }

    public void Play()
    {
        int clipToPlay = Random.Range(0, clips.Length);

        source.PlayOneShot(clips[clipToPlay].clip, clips[clipToPlay].volume);
    }
}
This will result in an inspector that looks like this:

This is just the default inspector appearance. You can always create your custom editor for your component to make the experience of setting this more suitable for your needs.
The disadvantage of this still is that each component you add to an object needs a separate array of sounds. What happens if most objects you have should have the same set of sounds (maybe with a few exceptions), and you want to be able to insert clips in just one place?
This one of the prominent examples in Richard Fine’s 2016 talk on Scriptable Objects. I recommend listening to this entire talk in any case. This would mean factoring out arrays of tuned clips from properties on individual objects into Scriptable Object assets.
[CreateAssetMenu(menuName = "Tuned Audio/Collection")]
public class TunedAudioCollection : ScriptableObject
{
    public TunedAudioClip[] clips;

    private void OnEnable()
    {
        Debug.Assert(clips != null && clips.Length > 0, this);
    }

    public void PlayIntoSource(AudioSource source)
    {
        int clipToPlay = Random.Range(0, clips.Length);

        source.PlayOneShot(clips[clipToPlay].clip, clips[clipToPlay].volume);
    }
}
You can then create TunedAudioCollection assets through the context menu. Now,
your RandomizedAudio could reference the asset instead:
using UnityEngine;

[RequireComponent(typeof(AudioSource))]
public class RandomizedAudio : MonoBehaviour
{
    private AudioSource source;
    public TunedAudioCollection collection;

    private void Awake()
    {
        Debug.Assert(collection != null, this);

        source = GetComponent<AudioSource>();
    }

    public void Play()
    {
        collection.PlayIntoSource(source);
    }
}
You would then set the collection directly in the inspector, and use the collection’s asset inspector to set individual sounds. We’ll go back to discussing all the techniques you might use Scriptable Objects in your game to improve its architecture in future installments.
Sounds & Volume Settings
Out of the box, Unity provides very coarse tools to deal with global volume settings and pausing audio.
Volume settings. The AudioListener class exposes a static volume float
property in the range [0, 1] that effectively multiplies the volume received
by each listener before outputting it. Setting AudioListener.volume = 0f;, for
example, will mute all audio in your game. There’s no quick built-in way to
apply different volumes for different “groups” Audio Sources.
Pausing. The AudioListener class exposes a static paused boolean
property. When true, no sounds will play, and any scheduled/delayed sound will
only play after enough time passes while the listener is unpaused. This is
helpful for basic pause menus, but if you want to play any audio effects (e.g.,
button hover effects in the pause menu), you will need to set
source.ignoreListenerPause = true; on them explicitly.
What if you want to allow players to set control/set volumes on different groups of sound? For example, you might want to enable the player to mute background music while turning up in-game effects.
You’ll need to manage this manually in code. First, you should figure out how to propagate volume change to individual objects. My recommendation here is using Scriptable Objects to represent individual values and passing these around.
Each RandomizedAudio or TunedAudioCollection instance can take a “Volume
Group Volume” object as a property and multiply its value by the individual
volume when playing a new clip.
For background audio, simply multiplying the sound by the volume wouldn’t work
since you’ll need to do it proactively as the volume changes. You can extend the
FloatVariable pattern from the above example with an On Change event/setter,
for example:
using UnityEngine;

[CreateAssetMenu(menuName = "Tuned Audio/Group Volume")]
public class GroupVolume : ScriptableObject
{
    [SerializeField] [Range(0, 1)] private float _initialValue;
    private float _runtimeValue;

    // Alternatively, consider a custom event property that
    // always fires the initial value.
    public event System.Action<float> VolumeChanged;
    public float Volume
    {
        get => _runtimeValue;
        set
        {
            _runtimeValue = value;
            VolumeChanged?.Invoke(_runtimeValue);
        }
    }

    private void OnEnable()
    {
        _runtimeValue = _initialValue;
    }
}
A background music “manager” component might then subscribe/unsubscribe to
GroupVolume in its OnEnable/OnDisable messages and use that to set
audioClip.volume in code.
Closing Thoughts
I hope this installment covers the beginner and intermediate use cases for playing and managing audio and gives you just enough context to look for the more advanced cases.
I’ve heard a decent amount of demand for installments focused on best practices and project architecture. The good news is we’re getting close to a point where we can do a deep dive into architecture. Also good news: a lot of what makes structuring your Audio playing and managing system hard applies to other aspects of designing your game. So a lot of the best practices we’ll cover here will apply to several parts aspects of Unity. If you would like more resources to read today, I would again emphasize this article or the talk it is based on and Richard Fine’s talk.
Finally, if you haven’t yet, consider subscribing for updates, and if you already subscribed, I’ll still appreciate if you share the articles you like. Just pick an option below!
Footnotes
-
Creating an effect object and destroying it shortly thereafter is probably okay for an effect that rarely happens. But if you’re spawning tons of bullets or explosions, that’s when pooling your objects becomes particularly helpful. ↩